
Introduction: Why Build a Medical Database with Docker?
Creating a robust medical database system requires careful consideration of security, scalability, and maintainability. Furthermore, Docker containerization offers an ideal solution for healthcare applications by providing isolated environments that ensure consistent deployment across different systems.
In this comprehensive tutorial, we’ll explore how to create a medical database with Docker and perform operations on it using various tools. Additionally, we’ll use a practical example: a database designed to store patient demographic and anthropometric data (age, sex, height, weight, etc.).
While the structure we present is relatively simple, it can be scaled to accommodate more complex architectures. Moreover, this foundation provides the flexibility needed for future healthcare system expansions.
Table of Contents
Introduction
- Overview of the tutorial
- Purpose and scope
Tools We’ll Use
- Docker
- Overview and containerization
- Benefits of isolation
- MySQL container setup
- SQLAlchemy
- Database interaction capabilities
- ORM functionality
- Flask
- Web framework basics
- Database interface creation
Step-by-Step Guide
- Step 1: Download and Configure MySQL Container
- Docker installation
- Container configuration
- Basic Docker commands
- Step 2: Creating Tables with SQLAlchemy
- Database structure setup
- Table relationships
- Data modeling
- Step 3: Data Operations with SQLAlchemy
- Session management
- Data insertion
- Query operations
- Step 4: Web Interface with Flask
- Application setup
- Route definitions
- Template organization
- Step 5: Security Consideration
- Step 6: Summary
All the code for this project is available on GitHub
Essential Tools for Medical Database Development
Why Docker Transforms Healthcare Database Management
Building a medical database with Docker provides several advantages including isolation, portability, and ease of setup. First of all, Docker is an open-source tool for developing, distributing, and running software.
Its key feature is containerization—applications run in isolated environments that contain everything needed for the program to work. However, these containers share the host computer’s kernel while remaining isolated from its operating system. Think of them as lightweight virtual machines that are more efficient because they leverage the host’s kernel.
Thanks to isolation from the “host” environment, containers prevent conflicts from different dependencies and configurations. Consequently, they operate independently from the system while maintaining data persistence through mounted volumes.
SQLAlchemy: Simplifying Database Interactions
Next, SQLAlchemy is one of the most popular Python libraries for working with relational databases. It enables Python code to interact directly with various SQL databases through specific drivers, including MySQL, PostgreSQL, Oracle, and SQLite.
A key feature of SQLAlchemy is its Object-Relational Mapper (ORM), which maps database tables to Python classes. As a result, database interactions become straightforward and intuitive, reducing development time significantly.
Flask: Creating User-Friendly Web Interfaces
Flask is a Python framework for creating web applications. With Flask, we can build SQLAlchemy applications that access databases through an HTML interface. Therefore, users can interact with the medical database without requiring technical database knowledge.
Prerequisites
To start the project, you need Docker (available at Docker: Accelerated Container Application Development) and Python (Download Python | Python.org) installed on your computer.
Step 1: Download and Configure MySQL Container
Setting Up Your Docker Environment
With Docker running on your computer, you can download the MySQL database image from the terminal using this command:
docker pull mysql:latest
This command downloads the latest MySQL image from the Docker Hub repository. Subsequently, once the image download is complete, we can create a container from it and configure it to meet our requirements.
Container Configuration and Setup
Navigate to the directory where you want to store your database (using standard commands like cd and mkdir). Then, run this script in the terminal:
docker run --name my-mysql-container \\
	-v my_directory/data:/var/lib/mysql \\
  -e MYSQL_ROOT_PASSWORD=my-secret-pw \\
  -e MYSQL_DATABASE=mydatabase \\
  -e MYSQL_USER=myuser \\
  -e MYSQL_PASSWORD=mypassword \\
  -p 3306:3306 \\
  -d mysql:latest
Here’s what each parameter means:
- –name: Sets the container’s name for easy identification
- -v: Specifies the volume where data is stored, ensuring persistence
- -e: Defines environment variables, including database credentials
- -p: Specifies communication ports for external access
- -d: Runs the container in detached mode
Managing Container Operations
These commands are only needed when initializing the container for the first time. After that, the specified parameters are saved and automatically applied whenever you run the container.
To verify the program has started successfully, use:
docker psOnce you’ve created and configured the container, you won’t need to use docker run again. Instead, you’ll use different commands to stop and restart the program.
Furthermore, to manage your container operations use:
To stop the container:
docker stop my-mysql-containerTo restart it, use:
docker start my-mysql-container
To completely delete the container, use this command:
docker rm -f my-mysql-container
Note: An alternative method called docker compose lets you manage container configurations through a docker-compose.yml file. This approach is typically used for applications with multiple containerized programs, but we won’t cover it in this tutorial.
Step 2: Creating Database Tables with SQLAlchemy
Environment Setup and Library Installation
It is recommended to use an IDE (like Visual Studio Code) and create a virtual environment to complete this step; you also need to verify that the container is active or activate it with the command:
docker start my-mysql-container
From Visual Studio Code’s terminal, install the required Python libraries:
pip install sqlalchemy pymysql
Establishing Database Connection
From Python, let’s import the required libraries:
from sqlalchemy import create_engine, Column, Integer, String, Date, Float, ForeignKey
from sqlalchemy.ext.declarative import declarative_base
from sqlalchemy.orm import sessionmaker, relationship
Define the database connection string (Replace ‘myuser’, ‘mypassword’, ‘localhost’, and ‘mydatabase’ with your actual MySQL credentials)
DATABASE_URL = "mysql+pymysql://myuser:mypassword@localhost:3306/mydatabase"
Create an engine to connect to the database. The engine manages the connection pool and database access. Setting echo=True enables SQL statement logging for debugging.
engine = create_engine(DATABASE_URL, echo=True)
SQLAlchemy uses a foundational “base” class that helps create database tables in Python. This base class acts as a template – when you create new table classes, they inherit from this base class, making it simple to define and work with database tables in your Python code.
To define it, we use the command:
Base = declarative_base()
Designing Patient Records Table
Now let’s create the first table, the patient’s PatientRecords using SQLAlchemy’s Base class as a template:
class PatientRecords(Base):
    __tablename__ = 'patient_records'  # Table name in the database

    # Columns
    Id_patient = Column(Integer, primary_key=True, autoincrement=True)  # Primary key
    first_name = Column(String(50), nullable=False)  # Patient's first name
    last_name = Column(String(50), nullable=False)  # Patient's last name
    date_of_birth = Column(Date, nullable=False)  # Patient's date of birth

    # Relationship with the "AnthropometricData" table
    anthropometric_data = relationship("AnthropometricData", back_populates="patient")

    def __repr__(self):
        return f"<PatientRecords(Id_patient={self.Id_patient}, first_name={self.first_name}, last_name={self.last_name})>"
In this script, we define both the table name (patients_record) and its fields, while also establishing a relationship with the Anthropometric_data table (relationship = AnthropometricData). This relationship is bidirectional (back_populates = “patient”). When we create the Anthropometric_data table, we’ll set up a corresponding PatientRecord relationship with a bidirectional link (back_populates = AnthropometricData) to the Patient_record table.
This creates a “logical” link between the two tables, complementing the structural connection already established through Foreign Keys at the database level.
The repr(self) method defines how an object should be represented when it is printed or displayed, converting it into a more readable string format.
Creating Anthropometric Data Table
Let’s create the second table (antropometric_data) using the same approach we used for the PatientRecords table.
class AnthropometricData(Base):
    __tablename__ = 'anthropometric_data'  # Table name in the database

    # Columns
    Id_data = Column(Integer, primary_key=True, autoincrement=True)  # Primary key
    Id_patient = Column(Integer, ForeignKey('patient_records.Id_patient'), nullable=False)  # Foreign key to "patient_records"
    height = Column(Float, nullable=False)  # Height in cm
    weight = Column(Float, nullable=False)  # Weight in kg
    BMI = Column(Float, nullable=False)  # Body Mass Index (calculated as weight / (height/100)^2)

    # Relationship with the "PatientRecords" table
    patient = relationship("PatientRecords", back_populates="anthropometric_data")

    def __repr__(self):
        return f"<AnthropometricData(Id_data={self.Id_data}, Id_patient={self.Id_patient}, BMI={self.BMI})>"
It’s important to note that, at this point, the tables exist only as logical definitions and haven’t been created in the actual database. The following command will transform them into real tables in our archive by converting our logical structure into SQL commands. SQLAlchemy handles this conversion automatically, saving us significant effort.
Base.metadata.create_all(engine)
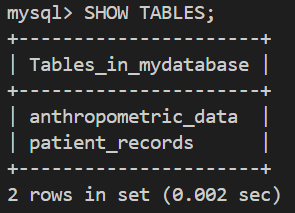
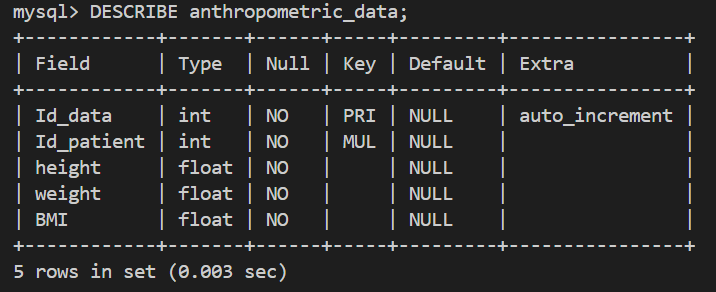
To verify that the tables were successfully created, you can interact directly with the MySQL database through the terminal with these commands:
docker exec -it my-mysql-container mysql -u myuser -p
USE mydatabase;
SHOW TABLES;
DESCRIBE patient_records;
DESCRIBE anthropometric_data;
These commands will display the following:

Step 3: Data Operations and Management
Session Management and Database Operations
After setting up the database and tables, we can proceed to populate them with content.
If you create a new program to perform database operations, you’ll need to include the table class definitions (PatientRecords and AnthropometricData) again. While you can copy these definitions manually, there are more efficient ways to avoid this duplication, though we’ll keep things simple and won’t cover those techniques here.
In order to perform database operations (such as queries and data insertion) with SQLAlchemy, we first need to use sessionmaker.
Session = sessionmaker(bind=engine)
session = Session()
When creating a session using sessionmaker, these operations happen automatically:
- Connection to the database through the engine
- Tracking of all pending database operations
- Execution of all operations in a single block when committed
A session follows this lifecycle:
- Creation (session = Session())
- Database interactions (queries, reads, insertions)
- Saving changes (session.commit())
- Rolling back changes if errors occur (session.rollback())
- Closing the session (session.close())
Adding Patient Records
Now that we have created a session, we can add a new patient to the patient_records table:
new_patient = PatientRecords(
    first_name="Mario",
    last_name="Rossi",
    date_of_birth="1990-05-15"  # Date format: YYYY-MM-DD
)
session.add(new_patient)
session.commit()
Note that we insert the new patient using the Python table class (PatientRecords) rather than the actual table name (patient_records). SQLAlchemy provides this layer of abstraction, letting us focus on logical operations instead of directly referencing table names. Behind the scenes, SQLAlchemy converts our code into SQL instructions to interact with the database.
Managing Anthropometric Data
Next, let’s add data to the anthropometric_data table:
anthropometric_data = AnthropometricData(
    Id_patient=new_patient.Id_patient,
    height=175.0,  # Height in cm
    weight=70.0,   # Weight in kg
    BMI=70.0 / ((175.0 / 100) ** 2)  # Calculate BMI
)
session.add(anthropometric_data)
session.commit()
Querying and Verification
Let’s query the tables to verify that our data was successfully inserted:
patients = session.query(PatientRecords).all()
print("\\nPatients in the database:")
for patient in patients:
    print(patient)

anthropometric_records = session.query(AnthropometricData).all()
print("\\nAnthropometric Data in the database:")
for record in anthropometric_records:
    print(record)
Finally, let’s close the session:
session.close()
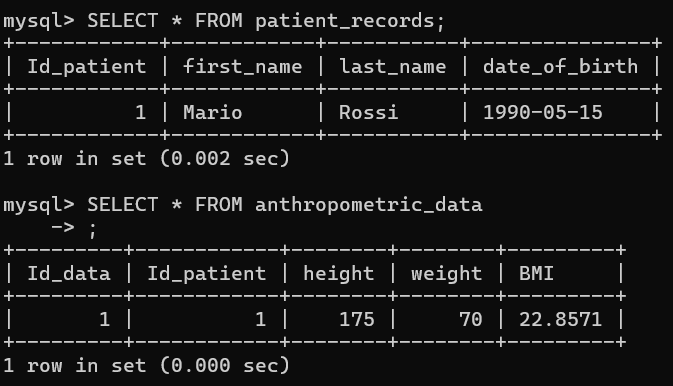
Alternatively, you can query the database directly through Docker using SQL commands in the terminal:
docker exec -it my-mysql-container mysql -u myuser -p
USE mydatabase;
SELECT * FROM patient_records;
SELECT * FROM anthropometric_data;
The terminal will display the following results:
Step 4: Building a Web Interface with Flask
Flask Installation and Setup
Flask is a lightweight web framework that lets you create browser-accessible applications to interact with MySQL containers.
First, install Flask in Python by running this command in the terminal:
pip install Flask
Next, we need to create a file called models.py that reuses our previous ORM class definitions for the database tables:
from sqlalchemy import Column, Integer, String, Date, Float, ForeignKey
from sqlalchemy.ext.declarative import declarative_base
from sqlalchemy.orm import relationship

Base = declarative_base()

class PatientRecords(Base):
    __tablename__ = 'patient_records'

    Id_patient = Column(Integer, primary_key=True, autoincrement=True)
    first_name = Column(String(50), nullable=False)
    last_name = Column(String(50), nullable=False)
    date_of_birth = Column(Date, nullable=False)

    anthropometric_data = relationship("AnthropometricData", back_populates="patient")

    def __repr__(self):
        return f"<PatientRecords(Id={self.Id_patient}, Name={self.first_name} {self.last_name})>"

class AnthropometricData(Base):
    __tablename__ = 'anthropometric_data'

    Id_data = Column(Integer, primary_key=True, autoincrement=True)
    Id_patient = Column(Integer, ForeignKey('patient_records.Id_patient'), nullable=False)
    height = Column(Float, nullable=False)
    weight = Column(Float, nullable=False)
    BMI = Column(Float, nullable=False)

    patient = relationship("PatientRecords", back_populates="anthropometric_data")

    def __repr__(self):
        return f"<AnthropometricData(Id={self.Id_data}, PatientId={self.Id_patient}, BMI={self.BMI})>"
Finally, we can create an app.py using Flask.
Our medical database project will use three HTML templates as the foundation for interacting with the container:
- index.html – the main page
- add_patient.html – for adding new patients
- edit_patient.html – for modifying patient records
Directory Structure and Organization
The directory organization will be:
flask_app/
│
├── app.py               # Main Flask app file
├── models.py            # ORM class definitions (PatientRecords, AnthropometricData)
├── templates/           # HTML templates folder
│   ├── index.html       # Main page
│   ├── add_patient.html # Form to add a patient
└ └── edit_patient.html# Form to modify a patientWe’ll create three HTML templates. The first (index.html) serves as the entry page, displaying the database content and allowing users to select various operations.
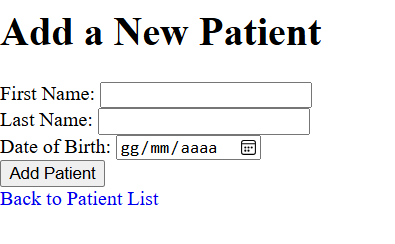
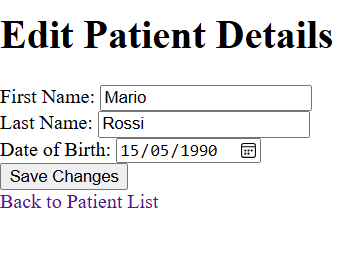
The second page (add_patient.html) provides a form for adding patients to the patient_records dataset, while the third page (edit_patient.html) enables modification of existing patient data.
At this stage, we’ve prioritized system functionality over aesthetics, though the visual aspects can be easily improved later.
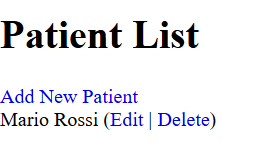
The script for index.html:
<!DOCTYPE html>
<html>
<head>
    <title>Patient List</title>
</head>
<body>
    <h1>Patient List</h1>
    <!-- Link to add a new patient -->
    <a href="{{ url_for('add_patient') }}">Add New Patient</a>
    <ul>
        <!-- Loop through all patients and display their details -->
        {% for patient in patients %}
            <li>
                {{ patient.first_name }} {{ patient.last_name }}
                <!-- Links to edit or delete the patient -->
                (<a href="{{ url_for('edit_patient', patient_id=patient.Id_patient) }}">Edit</a> |
                <a href="{{ url_for('delete_patient', patient_id=patient.Id_patient) }}">Delete</a>)
            </li>
        {% endfor %}
</ul>The script for add_patient.html:
<!DOCTYPE html>
<html>
<head>
    <title>Add Patient</title>
</head>
<body>
    <h1>Add a New Patient</h1>
    <!-- Form to submit new patient details -->
    <form method="POST">
        First Name: <input type="text" name="first_name"><br>
        Last Name: <input type="text" name="last_name"><br>
        Date of Birth: <input type="date" name="date_of_birth"><br>
        <button type="submit">Add Patient</button>
    </form>
    <!-- Link to return to the patient list -->
    <a href="{{ url_for('index') }}">Back to Patient List</a>
</body>
</html>
The script for edit_patient.html:
<!DOCTYPE html>
<html>
<head>
    <title>Edit Patient</title>
</head>
<body>
    <h1>Edit Patient Details</h1>
    <!-- Form to update patient details -->
    <form method="POST">
        First Name: <input type="text" name="first_name" value="{{ patient.first_name }}"><br>
        Last Name: <input type="text" name="last_name" value="{{ patient.last_name }}"><br>
        Date of Birth: <input type="date" name="date_of_birth" value="{{ patient.date_of_birth }}"><br>
        <button type="submit">Save Changes</button>
    </form>
    <!-- Link to return to the patient list -->
    <a href="{{ url_for('index') }}">Back to Patient List</a>
</body>
</html>
Flask Application Development
The app.py program follows below. The program uses Flask decorators (marked by “@app.route()”) to connect web pages with Python code, managing database requests and responses.
from flask import Flask, render_template, request, redirect, url_for
from sqlalchemy import create_engine
from sqlalchemy.orm import sessionmaker
from models import PatientRecords, AnthropometricData

# Database configuration
DATABASE_URL = "mysql+pymysql://myuser:mypassword@localhost:3306/mydatabase"
engine = create_engine(DATABASE_URL)  # Create a connection to the database
Session = sessionmaker(bind=engine)  # Create a session factory
session = Session()  # Initialize a session to interact with the database

# Initialize Flask app
app = Flask(__name__)

# Home Page: Display all patients
@app.route("/")
def index():
    patients = session.query(PatientRecords).all()  # Query all patients from the database
    return render_template("index.html", patients=patients)  # Render the template with patient data

# Add Patient Page: Handle form submission to add a new patient
@app.route("/add", methods=["GET", "POST"])
def add_patient():
    if request.method == "POST":
        # Retrieve form data
        first_name = request.form["first_name"]
        last_name = request.form["last_name"]
        date_of_birth = request.form["date_of_birth"]

        # Create a new patient object
        new_patient = PatientRecords(
            first_name=first_name,
            last_name=last_name,
            date_of_birth=date_of_birth
        )
        session.add(new_patient)  # Add the new patient to the session
        session.commit()  # Commit the transaction to save the data
        return redirect(url_for("index"))  # Redirect to the home page
    return render_template("add_patient.html")  # Render the form for GET requests

# Edit Patient Page: Handle form submission to update an existing patient
@app.route("/edit/<int:patient_id>", methods=["GET", "POST"])
def edit_patient(patient_id):
    patient = session.query(PatientRecords).get(patient_id)  # Retrieve the patient by ID
    if request.method == "POST":
        # Update patient details with form data
        patient.first_name = request.form["first_name"]
        patient.last_name = request.form["last_name"]
        patient.date_of_birth = request.form["date_of_birth"]
        session.commit()  # Commit the changes to the database
        return redirect(url_for("index"))  # Redirect to the home page
    return render_template("edit_patient.html", patient=patient)  # Render the edit form

# Delete Patient Page: Delete a patient by ID
@app.route("/delete/<int:patient_id>")
def delete_patient(patient_id):
    patient = session.query(PatientRecords).get(patient_id)  # Retrieve the patient by ID
    session.delete(patient)  # Delete the patient from the session
    session.commit()  # Commit the transaction to apply the deletion
    return redirect(url_for("index"))  # Redirect to the home page

# Run the Flask app
if __name__ == "__main__":
app.run(debug=True) # Start the app in debug mode for developmentThe initial page displays the database records and all available actions that can be performed on them:
The additional pages enable users to add or modify patient records:
Step 5: Critical Security Considerations
Understanding Healthcare Data Protection
We are dealing with a medical database and therefore sensitive data whose protection is regulated by legislation. Moreover, GDPR (General Data Protection Regulation) in Europe and HIPAA (Health Insurance Portability and Accountability Act) in the United States impose strict requirements.
Identifying Security Vulnerabilities
Even with a superficial analysis, we can identify numerous critical issues in the structure we have built:
- Exposed passwords: Access credentials to the dataset are embedded in the code and therefore easily stolen.
- Unauthenticated access: The Flask application lacks authentication mechanisms for HTML pages.
- Unencrypted data: Data transmission between the Flask server and HTML pages is not encrypted.
- SQL injection vulnerability: Input data is not validated, exposing the system to attacks through harmful SQL commands.
- Cross-Site scripting vulnerability: Malicious users could exploit the web interface to inject harmful scripts.
- Database exposure: The database is accessible on port 3306: if this port is public, it could be targeted for direct attacks.
Implementing Security Measures
Solutions to these issues include:
- Environment variable management for credentials
- Authentication middleware implementation
- HTTPS encryption for data transmission
- Input validation and parameterized queries
- Content Security Policy headers
- Network segmentation and firewall rules
Step 6: Summary and Next Steps
Key Concepts Review
Let’s summarize the key concepts covered in this tutorial:
First, we used Docker to create a MySQL container, providing an isolated and configurable medical database environment. Subsequently, we implemented SQLAlchemy as an ORM to map database tables to Python classes. Finally, we built a Flask web application that enables browser-based database interactions.
Future Development Possibilities
While this structure is straightforward, it serves as a robust foundation. Furthermore, it can be expanded into more complex architectures including:
- Multi-container orchestration with Docker Compose
- Advanced authentication and authorization systems
- Real-time data synchronization capabilities
- Comprehensive audit logging mechanisms
- Integration with Electronic Health Record (EHR) systems
Scaling Considerations
As your medical database grows, consider implementing:
- Database indexing strategies for improved performance
- Caching mechanisms for frequently accessed data
- Load balancing for high-availability deployments
- Backup and disaster recovery procedures
- Compliance monitoring and reporting tools
Conclusion: Building Secure Healthcare Systems
This tutorial has provided a comprehensive foundation for building medical databases with Docker. However, remember that production healthcare systems require additional security measures and compliance considerations.
Therefore, always consult with security professionals and legal experts when handling sensitive medical data. Additionally, stay updated with the latest security best practices and regulatory requirements in your jurisdiction.